Showing posts with label Tutorial. Show all posts

Sunday, August 18, 2013

Mocking an Asynchronous Web Service using SoapUI.


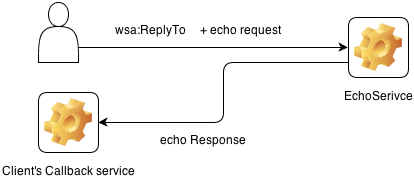
This is an example scenario.

Echo service is an asynchronous web service and this is the service which we are going to mock using SoapUI. Clients send requests to the echoService using ws-Addressing. Echo service uses ws-addressing headers to identify client's callback information and sends back echo-Response to client's callback services.


Tools used:

Step 1 : Obtain or Create wsdls files of the services which you are going to mock and client callback service.


Here I am using EchoService.wsdl file as my service's wsdl and ClientCBService.wsdl as client's callback service wsdl.

Step 2 : create a new SoapUI project using service and client WSDLs.
  • Open SoapUI.
  • Then goto File -> new SoapUI project or use shortcut key Ctrl + N
  • Give the your service wsdl path in initial wsdl/wadl filed and give an appropriate project name. ( Let's say EchoService ) and Click OK

Now Let's add client's wsdl into the same project.
  • right click on your SoapUI project and select "Add wsdl"

  • In "Add WSDL" window select your client wsdl and Click OK

( Note: Create Sample Requests for both server and client's callback operations if they were not created by default )


 Step 3 : Generate Mock service for EchoService

  • Right click on EchoService and select Generate MockService
  •   In Next windows click OK to create mock service with default values.


  • Now we have created the mock service. In Mock service window, click configure icon ( the most right icon) to set host name and port.

  • Give host name as localhost and give port which you prefer.


Step 4: Create a TestCase to invoke Client's callback service with echoService response. 

  • Right click on the client wsdl project and select Generate TestSuite.
  •  In next windows Click Ok to reate test suite with default values.


  •  Now You have create the TestSuite. Open the test-step which was created by default. Set echoString and messageID parameters in the request message. ( you can set parameter using ${parameter_name} )

  •  We will extract and set values to the above parameters in next step.


Step 5 : Write a groovy script to handle asynchronous behavior of the service.

  •  Double click on echo Operation in Mock-Service
  •   In opened Window select Dispatch type as Script.

  •  Then enter following code as our dispatch logic. It extract values from incoming request and parse to the testcase using a map. Also it sets testcase's end point address to the value that came with ReplyTo header.

Note: I wrote above script by modifying an answer in stackoverflow.com


Step 6 : Testing out Asynchronous Service

Now we have finished mocking our asynchronous service. But we need to have a callback service to get the response back.

  • Let's create another soapUI project to mock the callback wsdl. Follow above steps to create a mock service for client callback. For your reference I have added only few screenshots of most important steps. Note that I am using port as 8087 and host as localhost.


  • Start client Callback service by clicking green arrow of the mock service.


  •  Start our asynchronous echo (mock) service.

  • Now we are ready send a request to our mock service. Open request in EchoServiceSOAP and add mockservice endpoint to it.


  •  Click WS-A tab and enable ws-addressing. Then set "Action", "To", "ReplyTo", and "MessageID" fields in the request message as follow.

  •  Now we are ready to invoke our service. Click submit button in request window to send the request to mock service.
  • It returns an empty response. But if you check your callback service, you can see that actual echo response was sent to it.
  • You can view incoming request messages in both mock-services windows. Open both echoService request and echoReult message and Compare them for echoed string and ws-a messageID. ( see bellow screenshot.)


Links to Files:


Monday, July 1, 2013

Invoking Secured ESB Proxy Service Using SOAP UI

In this post, I am showing how you can invoked a secured proxy service, using SOAP UI tool.

Here I am using WSO2 ESB 4.6 and SOAP UI 4.5.1for this example.


Step 1: Create a proxy service 


Let's create a ESB proxy service first. Here I have created a proxy service to invoke echo service that comes with WSO2 ESB.


First let's try to invoke our proxy service without security. Here I am using tryIt tool. Click "Try this service" link in the EchoProxy row in the Deployed service. Use following sample request to invoke the service.


Request and Response of the EchoProxy


Step 2: Creating SOAP UI Project and Testing service.


  • Open SOAP UI tool and Create an new soapUI Project. ( File -> New soapUI project )
  • In the new soapUI project wizard, give the our EchoProxy service's wsdl url. (ex: http://localhost:8280/services/EchoProxy?wsdl ) 
  • Give the project name as "EchoProxy". Fill other fields as necessary.
  • Then Click Ok.
  • Then try to invoke our proxy service using soapUI as well.


Step 3: Securing the proxy service


Let's secure our proxy service now.

  • Go to service list (see 1 in Figure 1)
  • In Service list view, click on unsecured link (see 2 in Figure 1) in the EchoProxy row to secure the proxy.

Figure 1


  • In next Window, select "yes" to enable security for EchoProxy  ( Figure 2)

Figure 2


In this example, I am going to secure proxy service using security scenario 5 - "Sign and Encrypt - X509 Authentication"

  • So select security scenario 5 under Advanced Scenarios ( Figure 3 ) and click next.


Figure 3


  • For simplicity of this post, I am going to use wso2carbon.jks as Trusted Key Stores. So in next window ( Figure 4) Select wso2carbon.jks as Trusted Key Stores and click Finish. 

Figure 4

  • Now we have secured proxy our service.
Figure 5

Note: If you try to invoke our proxy service now using tryit or soapUI tool, it will fails. In next step let's try to invoke it by adding Sign and Encrypt - X509 Authentication to the soapUI request.


Step 4: Adding Sign and Encrypt - X509 Authentication to soapUI request.


Step 4.1 - Setting up ws-security configuration to soapUI project.

  • Right Click on your soapUI project (EchoProxy) and select "Show Project view" 
  • In the opened sub window, click "ws-security configuration" tab.
  • Now let's add a KeyStore first. For Simplicity I am adding wso2carbon.jks here again. You can find it from $ESB_HOME/repository/resources/security/ . But you can use your own valid keystore here.

Step 4.2 - Adding KeyStore


  • Go to the keystores tab ( see figure 6)
  • Add a keystore by clicking the button which is shown using arrow 1 in figure 6.
  • Select key store file. (ex: $ESB_HOME/repository/resources/security/wso2carbon.jks) 
  • It asks the password of the keystore. Give it. ( for wso2carbon.jks password is wso2carbon )
  • Then fill the Default Alias and Alias password fields. I am using wso2carbon for both fields. 

Figure 6


Step 4.3 - Setting up Out going Security Configuration.


  • Go to outgoing ws-security configuration tab.
  • Click button 1 ( Figure 7 ) to add outgoing security configuration. 
  • Give an unique name for the configuration. let's say it as EchoProxy-soap11SecuredRequest
  • Then fill the default Alias/Default Password fields. Use wso2carbon for both fields.
  • Then tick the must understand check box button.
Figure 7


  • Now Let's add wss entries. Click button 1 ( Figure 8) to add new wss entry.
  • First add Timestamp entry.
  • In the option window, fill the "time to live" field (ex: 300000)


Figure 8

  • Then let's add signature entry similar to timestamp.
  • Fill the options fields as given in figure 9.  
    • Keystore is wso2carbon.jks;
    • both alias and password is wso2carbon;
    • Key Identifier type is X509;
    • tick the use single certificate check box;
    • Leave other fields as default;
    • Then add a new part; which describes what we are going to sign. Since we are signing body of the soap11 request, let's add new part like this.
      • ID=Body
      • Name=Body
      • Namespace=http://schemas.xmlsoap.org/soap/envelope/
      • Encode=content
Figure 9

  • Since our proxy service is secured using sign and encryption, we need to add encryption as well. So add encryption entry similar to Timestamp and signature fields.
  • Fill the option fields as given in figure 10. 
    • Keystore is wso2carbon.jks;
    • both alias and password is wso2carbon;
    • Key Identifier type is X509;
    • tick the create encryption key check box;
    • Leave other fields as default;
    • Then add a new part; which describes what we are going to encrypt. Since we are encrypting  body of the soap11 request, let's add new part like this.
      • ID=Body
      • Name=Body
      • Namespace=http://schemas.xmlsoap.org/soap/envelope/
      • Encode=content

Figure 10


Now we are done with configuring out going message.

[Important] Please note that order of the ws entries matters when we are invoking the secured service. So always add those three one after the other. As an exercise try to change order of timestamp, signature and encryption and try to invoke the service.


Step 4.4 - Setting up Incoming Security Configuration.


  • Go to incoming ws-security configuration tab.
  • Similar to outgoing ws-security configuration first add incoming security configuration profile. Name it as EchoProxy-securedResponse
  • Fill the other fields as showing in figure 11.
    • Decrypt Keystore=wso2carbon.jks
    • Signature Keystore=wso2carbon.jks
    • password=wso2carbon

Figure 11


 Step 5 - Invoking secured Proxy service.


  • Open soap11 request. ( If you have already opened it, you may have to close and re-open it, to apply project changes which you did in step 4)
  • Click on button aut ( arrow 2 in Figure 12 ). It contains authentication related details.
  • Select outgoing wss that we created in step 4 from arrow 3.
  • Select incoming wss that we created in step 5 from arrow 4.
  • Then Invoke the request 1 by clicking green play arrow.
Figure 12
  •  you can view decrypted response from response window.  it is Done :)


[Important] Troubleshooting.

  • If you are running your system on a fresh JVM, you may face "Illegal key size or default parameters" [1] or similar problems since we are using encryption algorithms in this sample. To fix this you have to patch the JVM by applying "the Java Cryptography Extension (JCE), Unlimited Strength Jurisdiction Policy".
  • You can download it from http://www.oracle.com/technetwork/java/javase/downloads/
 
[1]
.....
Caused by: org.apache.xml.security.encryption.XMLEncryptionException: Illegal key size or default parameters
Original Exception was java.security.InvalidKeyException: Illegal key size or default parameters
    at org.apache.xml.security.encryption.XMLCipher.encryptData(XMLCipher.java:1140)
    at org.apache.xml.security.encryption.XMLCipher.encryptData(XMLCipher.java:1081)
    at org.apache.xml.security.encryption.XMLCipher.encryptElementContent(XMLCipher.java:855)
    at org.apache.xml.security.encryption.XMLCipher.doFinal(XMLCipher.java:985)
    at org.apache.ws.security.message.WSSecEncrypt.doEncryption(WSSecEncrypt.java:602)
    ... 24 more
Caused by: java.security.InvalidKeyException: Illegal key size or default parameters
    at javax.crypto.Cipher.checkCryptoPerm(Cipher.java:1011)
    at javax.crypto.Cipher.implInit(Cipher.java:786)
    at javax.crypto.Cipher.chooseProvider(Cipher.java:849)
    at javax.crypto.Cipher.init(Cipher.java:1213)
    at javax.crypto.Cipher.init(Cipher.java:1153)
    at org.apache.xml.security.encryption.XMLCipher.encryptData(XMLCipher.java:1137)
    ... 28 more


    Wednesday, June 8, 2011

    Developing WS-BPEL Processes using WSO2 Carbon Studio.

    Business Process Execution Language or WS-BPEL lets people orchestrate tasks and activities exposed as Web services. WSO2 Business Process Server can execute process descriptions written in WS-BPEL. Since BPEL is structured and based on XML, it is now far easier for business users to model and execute business processes using open source graphical tools like Eclipse BPEL Designer. This tutorial describes how to Develop a WS-BPEL Processes using WSO2 Carbon Studio.


    Read full tutorial at: http://wso2.org/library/tutorials/2011/04/using-carbon-studio-model-wsbpel-process-using-bpel-editor 

    Monday, May 16, 2011

    Creating a “Document Root” directory in Home directory on Ubuntu. ( Part 2 )

     ~*~ From the Part 1 ~*~

    Make user that you have installed php5 in your system. If not execute following commands in terminal.

     sudo apt-get install php5  
     sudo a2enmod php5  
    

    first line install the php5 and second line enables PHP in apache server. Then restart apache using,

     sudo /etc/init.d/apache2 restart  
    

    At this point, Apache and PHP are installed and ready to go.

    I’m using ubuntu lucid distribution,
    A recent update to the Lucid distribution, however, requires a slight change to /etc/apache2/mods-available/php5.conf to re-enable interpretation in users' home directories, but previous distributions do not require this change.

    Open give file using your favorite text editor. Here I am using gedit.

     sudo gedit /etc/apache2/mods-available/php5.conf  
    

    Comment out (or remove) the following lines:
     <ifmodule mod_userdir.c="">  
         <directory *="" home="" public_html="">  
           php_admin_value engine Off  
         </directory>  
     </ifmodule>  
    

    After doing this change, restart apache using,
     sudo /etc/init.d/apache2 restart  
    

    At this point, PHP should be successfully installed and working.

    But this method will enable PHP for all user directories. For security reason this method is not a good practice. One thing can do is enable only for one user directory. To do this, follow this procedure.

    Do not edit /etc/apache2/mods-available/php5.conf file and create a file (as root) called /etc/apache2/conf.d/php-in-homedirs.conf with the following contents:
     <ifmodule mod_userdir.c="">  
         <directory $username="" home="" public_html="">  
           php_admin_value engine On  
         </directory>  
     </ifmodule>  
    

    Simply replace the $USERNAME with the user name of the user you wish to allow PHP access to. Also note that the <directory> section may be repeated as many times as is necessary. Save the file, and restart Apache with a
    </directory>

     sudo /etc/init.d/apache2 restart  


    And PHP should only be enabled for the users listed in this file.

    ~*~ End of Tutorial ~*~
    =================================

    Saturday, May 7, 2011

    Creating a “Document Root” directory in Home directory on Ubuntu. ( Part 1 )

    Introduction:


    Generally Apache HTTP web server's document root is /var/www on Ubuntu/Debian Linux environment. (You can find the Document Root directive in /etc/apache2/sites-enabled/000-default.)

    But in this post I am going to tell you how to create a document Root directory under your Home directory. This directory can be used same as /var/www directory. 

    Advantages:

    Since this directory is in your home directory you do not need to worry about permission issues. Also this might help for normal desktop user as well as web site developers to run/test their web sites or applications.

    Here I’m using Apache Module userdir (http://httpd.apache.org/docs/2.0/mod/mod_userdir.html) to do this. Mooshak is a one of web based tool that uses this Apache userdir.

    Tested Environment:

    Ubuntu 10.10
    Apache 2.2.17


    Step1: Installing Apache2 and PHP5


    First we need to install apache2 and php5 in your machine. If they are already installed ignore this step.

    Open Linux terminal and type;
     $sudo apt-get install apache2 php5  
    

    If you want to make sure that, apache2 is installed correctly; open a web browser and go to link http://localhost/ . If page get loaded correctly with saying it's working, that means you have installed apache2 correctly.

    Also you can check the PHP installation using the terminal, just type in the terminal 

     $php -version  
    
     If it is correctly installed, you can see the installed version PHP in terminal.


    Step 2: Creating a directory “public_html”

    Create a directory under home directory called “public_html”. Here we are going to use this directory store our web pages.  Use any GUI base tool (file browser) or terminal for this. It doesn't matter. But do not use sudo command for this.

    In terminal fist go in to your home directory and type  

     $mkdir public_html  


    Step 3: Enable Apache module userdir

    Here we are enabling an Apache module, called userdir.


     Note:  
       
    You can find the available apache module under, /etc/apache2/mods-available/ .  
    Also you can find the module enabled under /etc/apache2/mods-enabled/.   


    To enable module userdir, type in terminal;


     $a2enmod userdir  
    

    Another Way:
    This is an alternative way to do same thing. That is symlink /etc/apache2/mods-available/userdir.load and /etc/apache2/mods-available/userdir.conf files to /etc/apache2/mods-enabled/ directory.
    To do this, type in terminal;


     $cd /etc/apache2/mods-enabled/  
     $sudo ln -s ../mods-available/userdir.conf userdir.conf  
     $sudo ln -s ../mods-available/userdir.load userdir.load  
    

    Restart Apache2 to enable userdir module.

     $sudo /etc/init.d/apache2 restart   
    

    Congratulation, now you have enabled public_html document root directory in your machine. Note that you can access your websites in your home directory by a URL in the form http://localhost/~USER_NAME. For example if your user account name is USER, then you can access your website(s) in your public_html  directory via, http://localhost/~USER.

    Testing the public_html directory using a sample html.
     

    Open your favorite text editor, type  

     <html>  
       <body>  
         <h1>Hello World&lt;/h1>  
         <p>This is the default web page for your user directory.</p>  
       </body>  
     </html>   
    

    Then save it as index.html in public_html directory.

    Then open your browser and enter URL of the your user directory.  You can see the web page that we have created.


    In Next Tutorial > How to enable PHP support in public_html 


    ~*~ goto Part 2 ~*~
    =============================